View controllers 通常是 iOS 项目中最大的文件,并且它们包含了许多不必要的代码。所以 View controllers 中的代码几乎总是复用率最低的。我们将会看到给 view controllers 瘦身的技术,让代码变得可以复用,以及把代码移动到更合适的地方。
你可以在 Github 上获取关于这个问题的示例项目。
把 Data Source 和其他 Protocols 分离出来
把 UITableViewDataSource 的代码提取出来放到一个单独的类中,是为 view controller 瘦身的强大技术之一。当你多做几次,你就能总结出一些模式,并且创建出可复用的类。
举个例,在示例项目中,有个 PhotosViewController 类,它有以下几个方法:
# pragma mark Pragma

- (Photo*)photoAtIndexPath:(NSIndexPath*)indexPath {
    return photos[(NSUInteger)indexPath.row];
}

- (NSInteger)tableView:(UITableView*)tableView
 numberOfRowsInSection:(NSInteger)section {
    return photos.count;
}

- (UITableViewCell*)tableView:(UITableView*)tableView
        cellForRowAtIndexPath:(NSIndexPath*)indexPath {
    PhotoCell* cell = [tableView dequeueReusableCellWithIdentifier:PhotoCellIdentifier
                                                      forIndexPath:indexPath];
    Photo* photo = [self photoAtIndexPath:indexPath];
    cell.label.text = photo.name;
    return cell;
}
这些代码基本都是围绕数组做一些事情,更针对地说,是围绕 view controller 所管理的 photos 数组做一些事情。我们可以尝试把数组相关的代码移到单独的类中。我们使用一个 block 来设置 cell,也可以用 delegate 来做这件事,这取决于你的习惯。
@implementation ArrayDataSource

- (id)itemAtIndexPath:(NSIndexPath*)indexPath {
    return items[(NSUInteger)indexPath.row];
}

- (NSInteger)tableView:(UITableView*)tableView
 numberOfRowsInSection:(NSInteger)section {
    return items.count;
}

- (UITableViewCell*)tableView:(UITableView*)tableView
        cellForRowAtIndexPath:(NSIndexPath*)indexPath {
    id cell = [tableView dequeueReusableCellWithIdentifier:cellIdentifier
                                              forIndexPath:indexPath];
    id item = [self itemAtIndexPath:indexPath];
    configureCellBlock(cell,item);
    return cell;
}

@end
现在,你可以把 view controller 中的这 3 个方法去掉了,取而代之,你可以创建一个 ArrayDataSource 类的实例作为 table view 的 data source。
void (^configureCell)(PhotoCell*, Photo*) = ^(PhotoCell* cell, Photo* photo) {
   cell.label.text = photo.name;
};
photosArrayDataSource = [[ArrayDataSource alloc] initWithItems:photos
                                                cellIdentifier:PhotoCellIdentifier
                                            configureCellBlock:configureCell];
self.tableView.dataSource = photosArrayDataSource;
现在你不用担心把一个 index path 映射到数组中的位置了,每次你想把这个数组显示到一个 table view 中时,你都可以复用这些代码。你也可以实现一些额外的方法,比如 tableView:commitEditingStyle:forRowAtIndexPath:,在 table view controllers 之间共享。
这样的好处在于,你可以单独测试这个类,再也不用写第二遍。该原则同样适用于数组之外的其他对象。
在今年我们做的一个应用里面,我们大量使用了 Core Data。我们创建了相似的类,但和之前使用的数组不一样,它用一个 fetched results controller 来获取数据。它实现了所有动画更新、处理 section headers、删除操作等逻辑。你可以创建这个类的实例,然后赋予一个 fetch request 和用来设置 cell 的 block,剩下的它都会处理,不用你操心了。
此外,这种方法也可以扩展到其他 protocols 上面。最明显的一个就是 UICollectionViewDataSource。这给了你极大的灵活性;如果,在开发的某个时候,你想用 UICollectionView 代替 UITableView,你几乎不需要对 view controller 作任何修改。你甚至可以让你的 data source 同时支持这两个协议。
将业务逻辑移到 Model 中
下面是 view controller(来自其他项目)中的示例代码,用来查找一个用户的目前的优先事项的列表:
- (void)loadPriorities {
    NSDate* now = [NSDate date];
    NSString* formatString = @"startDate = %@";
    NSPredicate* predicate = [NSPredicate predicateWithFormat:formatString, now, now];
    NSSet* priorities = [self.user.priorities filteredSetUsingPredicate:predicate];
    self.priorities = [priorities allObjects];
}
把这些代码移动到 User 类的 category 中会变得更加清晰,处理之后,在 View Controller.m 中看起来就是这样:
- (void)loadPriorities {
    self.priorities = [user currentPriorities];
}
在 User+Extensions.m 中:
- (NSArray*)currentPriorities {
    NSDate* now = [NSDate date];
    NSString* formatString = @"startDate = %@";
    NSPredicate* predicate = [NSPredicate predicateWithFormat:formatString, now, now];
    return [[self.priorities filteredSetUsingPredicate:predicate] allObjects];
}
有些代码不能被轻松地移动到 model 对象中,但明显和 model 代码紧密联系,对于这种情况,我们可以使用一个 Store:
创建 Store 类
在我们第一版的示例程序的中,有些代码去加载文件并解析它。下面就是 view controller 中的代码:
- (void)readArchive {
    NSBundle* bundle = [NSBundle bundleForClass:[self class]];
    NSURL *archiveURL = [bundle URLForResource:@"photodata"
                                 withExtension:@"bin"];
    NSAssert(archiveURL != nil, @"Unable to find archive in bundle.");
    NSData *data = [NSData dataWithContentsOfURL:archiveURL
                                         options:0
                                           error:NULL];
    NSKeyedUnarchiver *unarchiver = [[NSKeyedUnarchiver alloc] initForReadingWithData:data];
    _users = [unarchiver decodeObjectOfClass:[NSArray class] forKey:@"users"];
    _photos = [unarchiver decodeObjectOfClass:[NSArray class] forKey:@"photos"];
    [unarchiver finishDecoding];
}
但是 view controller 没必要知道这些,所以我们创建了一个 Store 对象来做这些事。通过分离,我们就可以复用这些代码,单独测试他们,并且让 view controller 保持小巧。Store 对象会关心数据加载、缓存和设置数据栈。它也经常被称为服务层或者仓库。
把网络请求逻辑移到 Model 层
和上面的主题相似:不要在 view controller 中做网络请求的逻辑。取而代之,你应该将它们封装到另一个类中。这样,你的 view controller 就可以在之后通过使用回调(比如一个 completion 的 block)来请求网络了。这样的好处是,缓存和错误控制也可以在这个类里面完成。
把 View 代码移到 View 层
不应该在 view controller 中构建复杂的 view 层次结构。你可以使用 Interface Builder 或者把 views 封装到一个 UIView 子类当中。例如,如果你要创建一个选择日期的控件,把它放到一个名为 DatePickerView 的类中会比把所有的事情都在 view controller 中做好好得多。再一次,这样增加了可复用性并保持了简单。
如果你喜欢 Interface Builder,你也可以在 Interface Builder 中做。有些人认为 IB 只能和 view controllers 一起使用,但事实上你也可以加载单独的 nib 文件到自定义的 view 中。在示例程序中,我们创建了一个 PhotoCell.xib,包含了 photo cell 的布局:
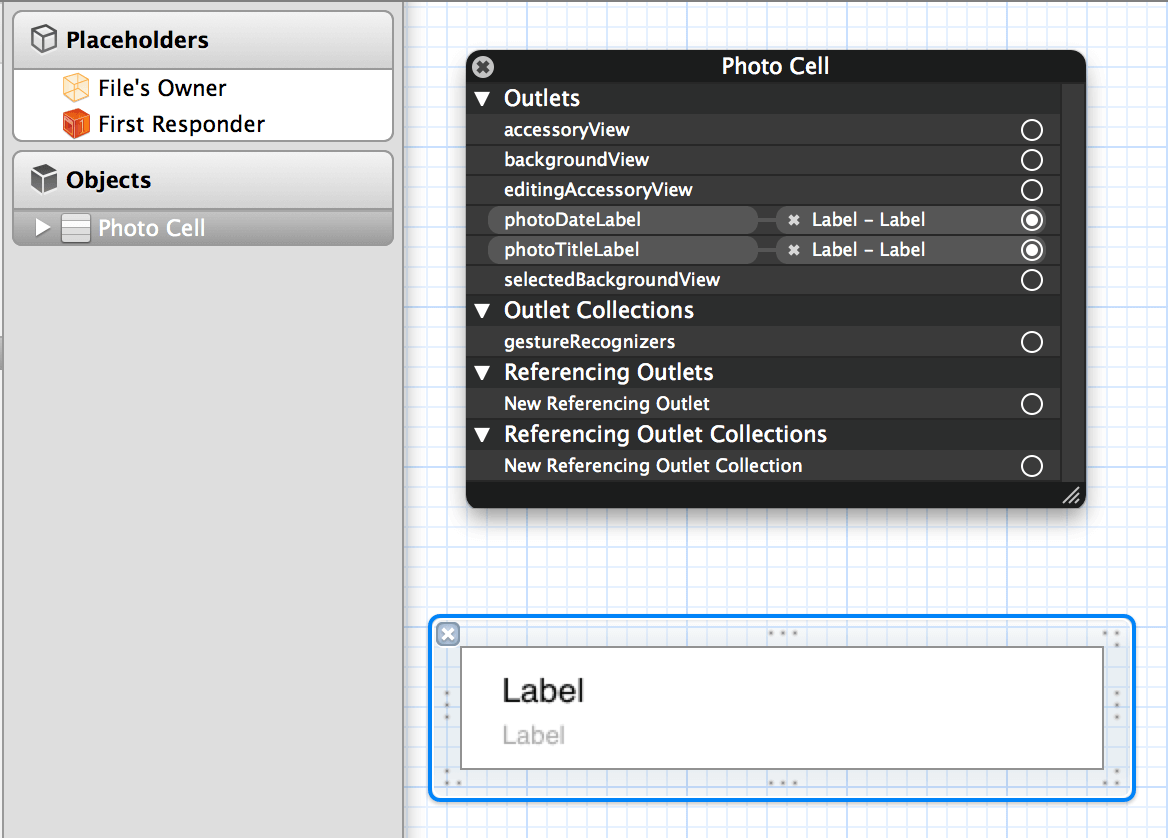
就像你看到的那样,我们在 view(我们没有在这个 nib 上使用 File's Owner 对象)上面创建了 properties,然后连接到指定的 subviews。这种技术同样适用于其他自定义的 views。
通讯
其他在 view controllers 中经常发生的事是与其他 view controllers,model,和 views 之间进行通讯。这当然是 controller 应该做的,但我们还是希望以尽可能少的代码来完成它。
关于 view controllers 和 model 对象之间的消息传递,已经有很多阐述得很好的技术(比如 KVO 和 fetched results controllers)。但是 view controllers 之间的消息传递稍微就不是那么清晰了。
当一个 view controller 想把某个状态传递给多个其他 view controllers 时,就会出现这样的问题。较好的做法是把状态放到一个单独的对象里,然后把这个对象传递给其它 view controllers,它们观察和修改这个状态。这样的好处是消息传递都在一个地方(被观察的对象)进行,而且我们也不用纠结嵌套的 delegate 回调。这其实是一个复杂的主题,我们可能在未来用一个完整的话题来讨论这个主题。
总结
我们已经看到一些用来创建更小巧的 view controllers 的技术。我们并不是想把这些技术应用到每一个可能的角落,只是我们有一个目标:写可维护的代码。知道这些模式后,我们就更有可能把那些笨重的 view controllers 变得更整洁。
扩展阅读
- View Controller Programming Guide for iOS
- Cocoa Core Competencies: Controller Object
- Writing high quality view controllers
- Stack Overflow: Model View Controller Store
- Unburdened View Controllers
- Stack Overflow: How to avoid big and clumsy
UITableViewControllerson iOS